Guest Post by: Rachael Jones
Many homeowners use permanent, automatic sprinkler systems to irrigate their lawns, flower beds, and miscellaneous plants. While these systems are installed to provide the homeowner minimal maintenance, it is pertinent to conduct routine maintenance and repairs to fix any damages and component failure that may have taken place.
Do not wait until you notice a problem to maintain your sprinkler system. Prompt maintenance of your system prevents loss and damage to your property, and catches any issues before your automatic sprinkler system begins wasting water. Identifying the exact problem can prevent additional issues for homeowners. Some issues are easily fixable; however, they must be properly identified.
The basic issues that are commonly discovered when checking automatic sprinkler systems include:
• Pipe leaks and breaks
• Obstructed / clogged sprinklers
• Leaking sprinklers
Pipe Leaks and Breaks
Damaged underground water pipes are a common source of leaks in automatic sprinkler systems. Make certain to check for any leaks or breaks while your irrigation system is on. Signs that you might have a pipe issue include large wet areas, visible pools of water, and areas that are significantly greener than the rest of your lawn. If you don’t see any pools of water but can see areas where the grass is greener (no pun intended), or you have a zone that has low pressure, the greener area may be where your system is leaking.
Large water leaks can cause water to be noticeably visible above the surface. You may need to hire a contractor if you notice large leaks that are below the ground and require digging. If you think it is a smaller fix, here are some steps you can follow to help you maintain your leak or break, while keeping the area clean.
1. Dig the soil away from the area where you suspect a leak, making sure not to cut other pipes in the process.
2. Cut the leaking or broken pipe. For small leaks, cut away the portion of the pipe that is leaking. For larger leaks, remove five to six inches of pipe from both sides of the break.
3. Thoroughly clean the pipe ends. Your pipe and couplings need to be cleaned and dried in order to successfully repair the leak.
4. Add PVC primer to the pipe ends and to the inside of two, straight couplers. Add a small amount of PVC pipe cement where you applied the primer.
5. Forcefully push the couplers onto the ends of the PVC pipe until they are snug.
6. Cut a single piece of PVC to fit between the two couplers that is as long as the space between the two couplers and the length of pipe that fits into each coupler.
7. Add PVC primer and pipe cement on one end of the pipe and one coupler, and then push the two pieces together. Repeat for the other end of the pipe and second coupler.
8. Before turning your sprinkler system on, allow the cement to dry for a minimum of one hour.
Obstructed / Clogged Sprinklers
Sprinklers become clogged or obstructed over time by dirt, debris, and objects that block the sprinkler head. When clogged, little to no water will exit the sprinkler nozzle. To unclog your sprinkler head, follow these steps:
1. Raise the riser (what pops up) of the sprinkler using a soft-surfaced clamp. Do not use excessive force.
2. Take the top part off of the spray head and remove the filter from the inside of the sprinkler. You may need a paper clip to properly remove the filter.
3. Rinse the filter and the spray nozzle thoroughly.
4. Flush your automatic sprinkler system to verify that there is no debris in the lines.
5. Replace the filter, aiming the nozzle in the direction it originally located.
6. Turn on your irrigation system to verify you are hitting your targeted area.
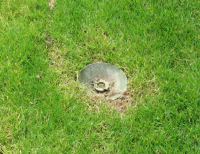
When a sprinkler becomes obstructed, it is often due to forgetting the sprinkler head’s location in your yard. Make sure that any objects, such as large potted plants, are not placed in front of the sprinkler’s targeted area. It is also important to maintain the area surrounding your sprinkler head. Grass can grow around and over sprinklers, making it nearly impossible for the sprinklers to function properly. Over time, sprinkler heads can be pushed further into the ground, leading to your sprinkler having a diminished spray area.
Leaking Sprinklers
Often times, a leaking sprinkler is the result of damage that took place while mowing or performing other lawn care maintenance. Leaks can also take place when seals are worn down over time. Leaks in your irrigation system can lead to a loss of pressure, which can then lead to dry areas in your yard. If unchecked, this water loss can lead to high water bills and wet areas in the area surrounding the leak.
There are several different types of irrigation valves, with each creating different problems and requiring unique maintenance. The issues that can cause valve leaks depend on the type of valve your automatic sprinkler system uses. Typically, if a valve has an external crack, you will need to replace it. However, most irrigation suppliers carry the necessary supplies to repair valves. If your sprinkler is located below ground, you will need to dig around the sprinkler to free it from the soil. Use a hand shovel when digging to prevent cutting the irrigation line running to the sprinkler.