This is a guest post by Amber Strauff who is here to teach us how to make a rainwater collector. If you have had any experience with collecting rainwater for your own yard or garden, please share in the comments. Thank you.
 Professional landscaping is crucial when you become a homeowner. In fact, the American Society of Landscape Architects suggests that proprietors invest 10% of their home’s values in landscaping. However, there are many different landscaping options that can save you money without sacrificing the quality of your landscaping efforts. A great amount of information is available for everyone on ways to save money and energy and water resources that could be easily adapted to the maintenance of your home’s yard. Solar lights, efficient timed sprinklers for watering your plants and reel lawn mowers are all great examples on how homeowners are beginning to change their landscaping maintenance methods to make the world a greener place.
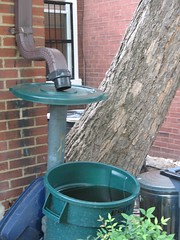
Another great way to save water is by installing a rainwater collector that you can water your plants with until the next time it rains. This is a fantastic way to save money on your water bills and keeping your home’s curb appeal intact. The process to set this up could take from one to two hours if you plan the installation properly.
Here’s how to set the system:
- The first step to have a working rain water collector is to have unclogged gutters and downspouts so you can collect as much water as possible.
- After you have already made sure that your gutters and downspouts are working properly, you will need to find a container that is sturdy enough for water collection. Select a container that suits your garden’s size and design. This container can be made of any water resisting material. People usually prefer plastic containers or wooden barrels. Just make sure that the one you choose doesn’t leak the water out.
- Once we have this container, you need to add a brass fitting on the top that will collect the water from your downspout.
- The next step is to place a large spigot towards the bottom part of the container, but not at the bottom. You can place more than one spigot, depending on the size of your container. Once the system is installed and working properly, you will be able to hook up a garden hose to any of the spigots, or use them to fill other containers up in case you need to transport the water to an area that is further away from the container.
- The next step is to mount a water diverter to the downspout elbow with gutter screws.
- The diverter should have two outlets, one to fill your container and the other to get rid of excess water once your container is filled.
- Once your water diverter is set attached and accommodated to your downspout, you will need to connect a rubber hose from the diverter to the container.
- Enjoy your new rainwater collector!
Setting up a rainwater collector system will be extremely rewarding and very cost efficient. This eco friendly solution to conserve water is one of the most affordable ones and could save you hundreds of dollars in water bills by the end of the year. It’s time to start saving money towards a more beautiful garden.
Amber Staub is a staff writer with Fortified Roofing, a leading provider of roofing services in Cherry Hill, NJ.


[…] underneath Landscaping, Water Conservation. You can follow any responses to this entrance by a RSS 2.0 […]
what does 1 yard of dirt look like…
[…]DIY: Installing a Roof Rain Water Collection for Your Landscape « Sprinkler Buddy Blog[…]…
Build water solar…
[…]DIY: Installing a Roof Rain Water Collection for Your Landscape « Sprinkler Buddy Blog[…]…
How to solar…
[…]DIY: Installing a Roof Rain Water Collection for Your Landscape « Sprinkler Buddy Blog[…]…
[…] you are looking to save water you should consider a rain barrel which would attach to your rain gutter. Be mindful, however, that […]
Hi! Would you mind if I share your blog with my myspace
group? There’s a lot of people that I think would really enjoy your content. Please let me know. Thanks
That would be much appreciated. Thanks